Forensic Workstation/Lab (pt. 2 pfsense)
Part 1: Overview
Part 3: Hypervisor
pfsense probably is the most well-known used used open-sourced Linux firewall appliance in used today. It provides an easy to use web page GUI and installation is extremely easy. However, someone could run iptables, ufw, or something else on choose your favor of Linux for a highly customized firewall solution without the GUI and pre-configured system.
Downloading and Installation
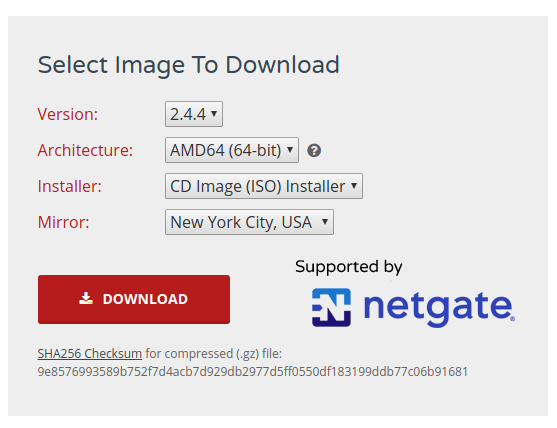
pfsense Comunity Edition is downloaded directly from the website: https://www.pfsense.org/download/
Then choosing the following options:
In Oracle VM VirtualBox Manager, create a new VM with the following settings:
- name: pfSense
- Type: BSD
- Version: FreeBSD (64-bit)
- Memory: 1024 MB (default)
- Hard Drive: 7 GB
- Network:
- Adapter 1
- Enabled
- Attached to: Bridged Adapter
- Name: <choose your PHY network adapter name>
- Advanced > Promiscuous Mode > Allow VMs (needed?)
- Adapter 2
- Enabled
- Attached to: Internal Network
- Name: corp
- Adapter 3
- Enabled
- Attached to: Internal Network
- Name: untrusted
- Adapter 4
- Enabled
- Attached to: Internal Network
- Name: semi-trust
- Adapter 1
- Storage:
- Controller > CD/DVD Rom > Load pfSense ISO
After creating the VM, start the VM (Right Click > Start > Normal Start). Let the VM boot into the installer.
When the installer starts, follow these options:
- Accept the Copyright statement.
- Choose Install option and select OK.
- Keymap Selection: Continue with default keymap
- (Note: "US" is the default).
- Partitioning: Auto (UFS)
- (Note: I did not see a need to do some custom setup here but you can do custom partition by either directly in the shell or Manually).
- After a few minutes, the installation completed.
- Manual Configuration: No
- In the VM Window, at the bottom of the screen, there is a set of icons, right click the "CD" icon and choose "Remove disk from virtual drive." If you get the force unmount prompt, hit "Yes"
- Complete: Reboot
After first boot, it will enter set of prompts:
- Should VLANs be setup now [y|n]? n
- Enter the WAN interface name or 'a' for auto-detection: a
- Do you want to proceed [y|n]? y
Next, I went ahead and setup the other interfaces. Select OPT 1 from the menu and you should see the following interfaces:

If these are missing then you need to modify your VM network settings as noted above before continuing.
Skip the VLAN configuration again.
Follow the prompts to setting the following settings per interface:
- WAN - em0
- LAN - em1
- OPT1 (Option 1) - em2
- OPT2 (Option 2) - em3
This sets each interface from Virtualbox to an interface for pfSense. Next, set the IP addresses, choose OPT 2 from the menu. Choose 3 different networks (one per interface):
- em1 - 172.16.0.1/24
- em2 - 172.16.4.1/24
- em3 - 172.16.8.1/24
You can create smaller networks or different networks. I choose to use a 24-bit mask to make it easy and spacing the 3-rd octet out so I know exactly which network has what VMs on it.
Do not enable DHCP on any of the LANs. Apparently, in 2.4.4, there is a parse error and it will not take the configuration.
Do not revert the webConfigurator to HTTP per the prompt that pops up.
You will have the following interface configurations:

Web Interface Configurations
Caveat: As soon as you configure a LAN IP Address, the web configuration can only be access from the LAN network and not the WAN network for security reasons. There are two things that can be done:
- Install and Configure the primary VM on the LAN (corp) network to provide access to the web configuration page.
- Download any Live Distro CD/DVD which has an interface and a web browser in it such as KALI, Linux Mint, Ubuntu, or others; then, setup a VM on the LAN (corp) to boot the Live Distro and provide the web browser access.
For this configuration, I am using Linux Mint Debian Edition. I set a manually IP address of 172.16.0.2 on the box (remember no DHCP configured yet on the LAN).
Use the default login: admin/pfsense
After logon, the pfSense Step wizard automatically starts. Keep the defaults except change the password at Step 6.
DNS Resolver
To Configure, go to Services > DNS Resolver > General Settings
Then, I change Network Interfaces by selecting all LAN, OPT1, and OPT2 IPV4 and IPV6 interfaces.
Then, I set the Outgoing Network Interfaces to only WAN.
Next, go to Setup > General Settings and uncheck "Allow DNS server list to be overridden by DHCP/PPP on WAN". This ensures pfSense uses the root DNS servers for all requests instead of the local network.
DHCP Server
To Configure, go to Services > DHCP Server.
Enable DHCP server on all interfaces. I set the range to 172.16.X.20 - 30 for each interface.
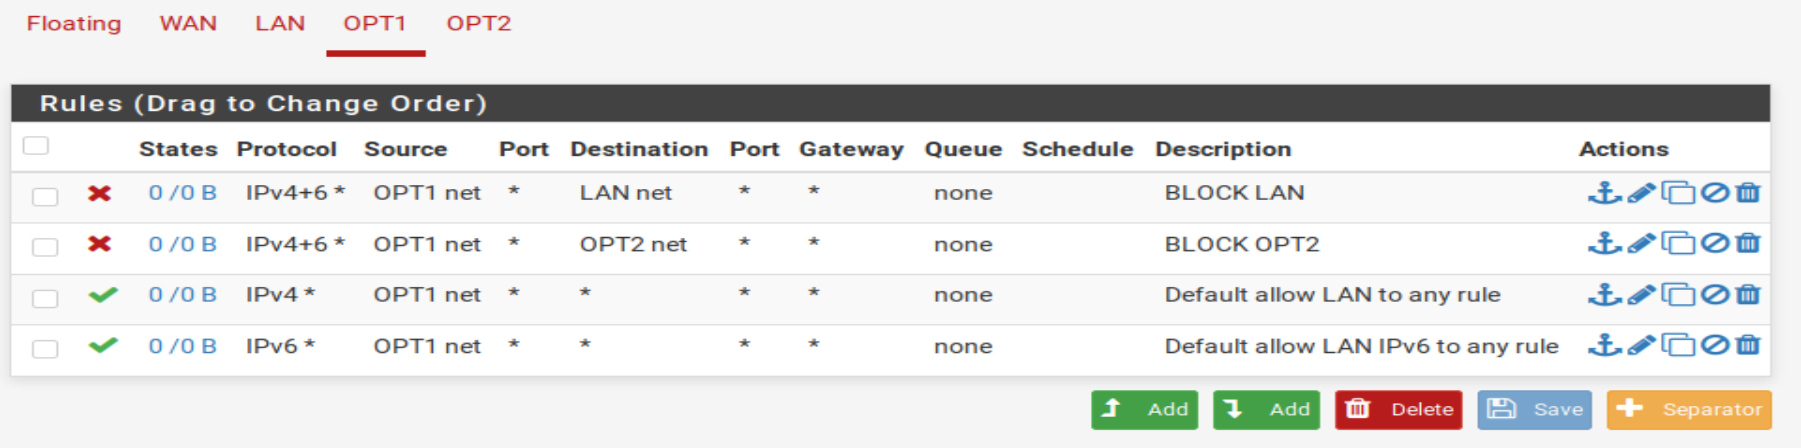
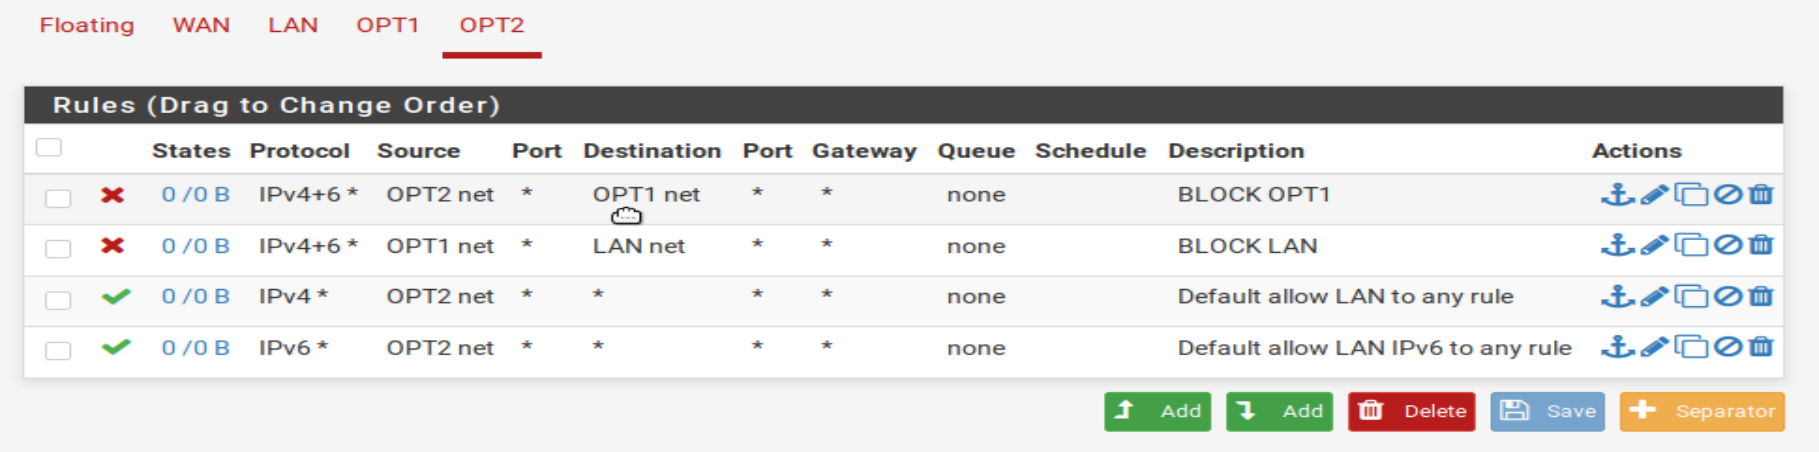
Firewall
Next, I added rules to ensure each network could not reach each other isolating the networks.

Other Considerations
This is just a basic configuration. You could add changes to the LAN where only VLAN traffic was allowed out to further protect personal data. There are tons of security configurations within pfSense which can also be explored depending on how locked down the box needs to be.